Frequently Asked Questions
Some FAQ answers may use C++ code snippets; however, the answers apply to the python bindings SDK too.
How many threads does the SDK use for inference?
The SDK inference engines can use up to 8 threads each, but this is dependant on the number of cores your system has.
The batchIdentifyTopCandidate function is capable of using all cores on your machine, depending on the number of probe faceprints provided.
How can I reduce the number of threads used by the SDK?
If you need to reduce the number of threads utilized by the SDK, this can be achieved using the OpenMP environment variable OMP_NUM_THREADS.
Is the SDK threadsafe? Yes, the SDK is threadsafe.
What is the difference between the static library and the dynamic library?
The static library libtf.a is the CPU only library, while the dynamic library libtf.so offers GPU and CPU support. You will need to have CUDA 10.1 installed in order to use the dynamic library.
What hardware does the GPU library support? The GPU enabled SDK supports NVIDIA GPUs, and currently supports CUDA 10.1.
Why is my license key not working with the GPU library? The GPU library requires a different token which is generally tied to the GPU ID. Please speak with a sales representative to receive a GPU token.
Why does the first call to an inference function take much longer than the subsequent calls? Our modules use lazy initialization meaning the machine learning models are only loaded into memory when the function is first called instead of on SDK initialization. This ensure minimal memory overhead from unused modules. When running speed benchmarks, be sure to discard the first inference time.
How do I use the python bindings for the SDK?
Simply download the python bindings library and place it in the same directory as your python script.
The CPU python bindings library already includes the X86_64 version of the SDK so you will not need to download it as well.
If using the GPU python bindings library, then you will require both the python bindings library as well as libtf.so (both are packaged in the download zip).
Ensure that libtf.so is in your LD_LIBRARY_PATH. You can confirm this by running ldd on the bindings library and ensuring that all dependencies are met.
All you need to do from there is add import tfsdk in your python script and you are ready to go.
How do I choose a similarity threshold for face recognition? Navigate to performance.trueface.ai and use the ROC curves to select a threshold based on your use case. The LITE model in the SDK corresponds to “Model-lite” while the FULL model corresponds to “Model-TFV4”. Refer to this blog post for advice on reading ROC curves.
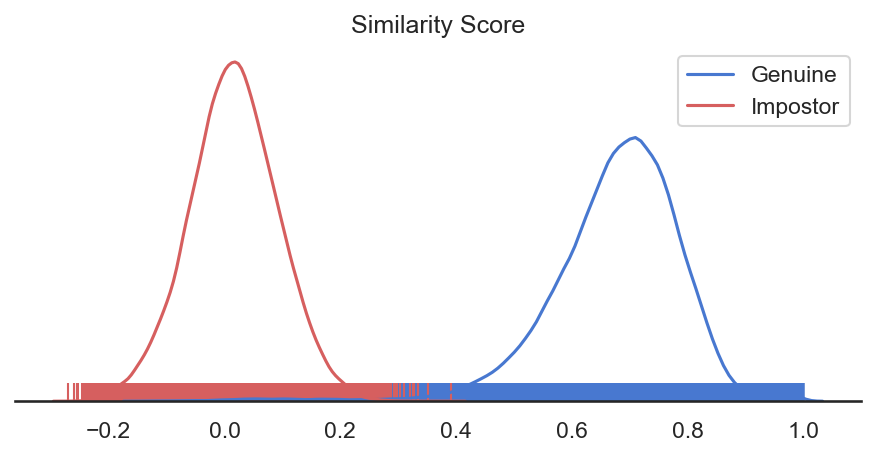
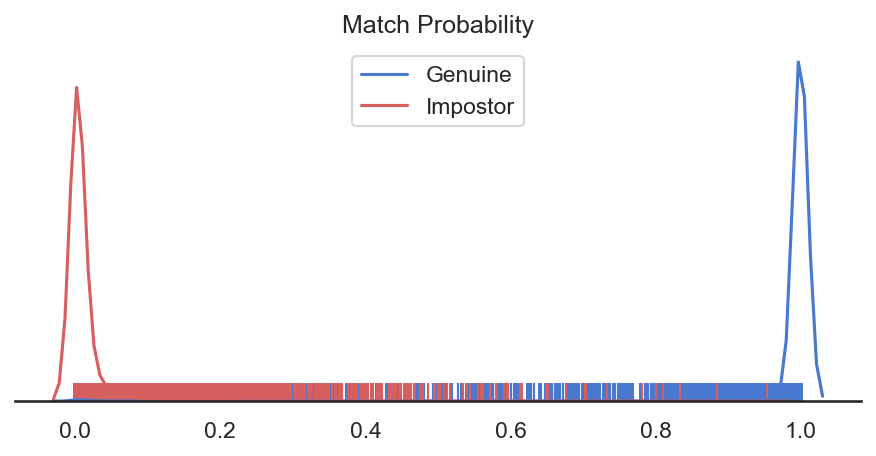
What is the difference between similarity score and match probability? The similarity score refers to the similarity between two feature vectors. The similarity score values can range from -1 to 1. The match probability describes the probability that the two feature vectors belong to the same identity. The match probability can range from 0 to 1.
A regression model is used to transform the similarity score to match probability:
There are many face detection and recognition functions. Which should I use?
This depends on the use case, but a few of the most popular pipelines will be outlined below.
You start by calling setImage. You can either pass this function a path to an image on disk or an image buffer. Next, you have a few options:
1) You can straight away call getLargestFaceFeatureVector which will return the Faceprint of the largest face in the image.
This is perfect for when you only care about the largest face, for example when enrolling a face into a collection.
Be sure to check the ErrorCode from this function call as an image with no face will return ErrorCode::NO_FACE_IN_FRAME.
2) Call detectLargestFace which will return the FaceBoxAndLandmarks of the largest face in the frame. The FaceBoxAndLandmarks can then be passed to
getFaceFeatureVector to generate the face feature vector. This flow is useful for when you require the bounding box coordinates,
such as for drawing a bounding box around the face.
3) Call detectFaces which will return a list of FaceBoxAndLandmarks representing all the faces found in the frame. These faces can then be individually passed to
getFaceFeatureVector to generate the feature vectors, or you can call getFaceFeatureVectors on the list to batch generate the feature vectors. This flow is ideal for
situations where you want to run identification on every face in the image.
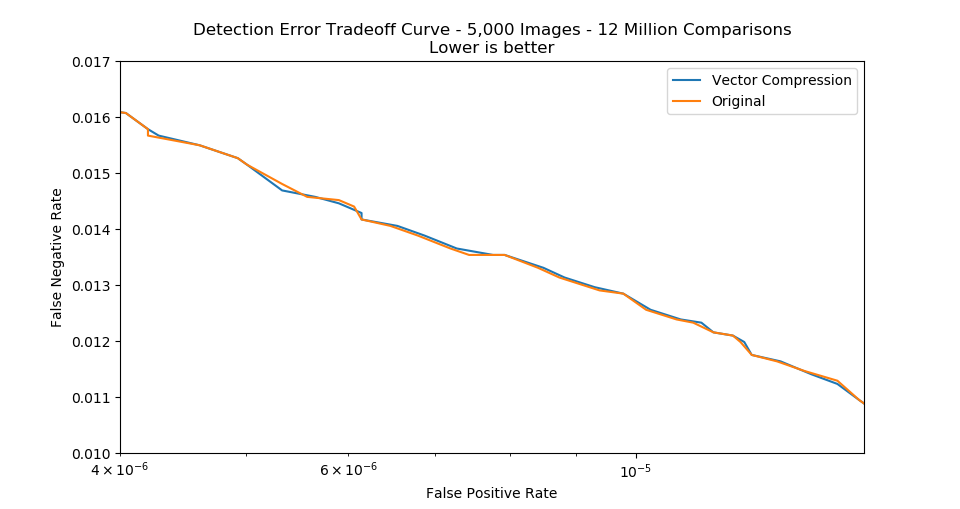
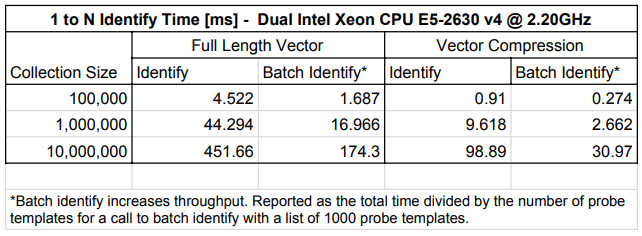
What does the frVectorCompression flag do? When should I use it?
The frVectorCompression flag is used to enable optimizations in the SDK which compresses the feature vector and improve the match speed for
both 1 to 1 comparisons and 1 to N identification. This flag supports both the LITE and FULL feature vectors.
The flag should be enabled when dealing with massive collections or when matching is very time critical. Additionally, it should be used in environments with limited memory or disk space as it will reduce the feature vector memory footprint.
The following images compare the match speed with and without the optimization enabled:

The trade off to using this flags is that it will cause a very slight loss of accuracy. However, the method has been optimized to ensure this loss is extremely minimal. The following Detection Error Tradeoff (DET) curve, made using a private dataset, shows that the difference in accuracy is minimal: